
Table of Contents
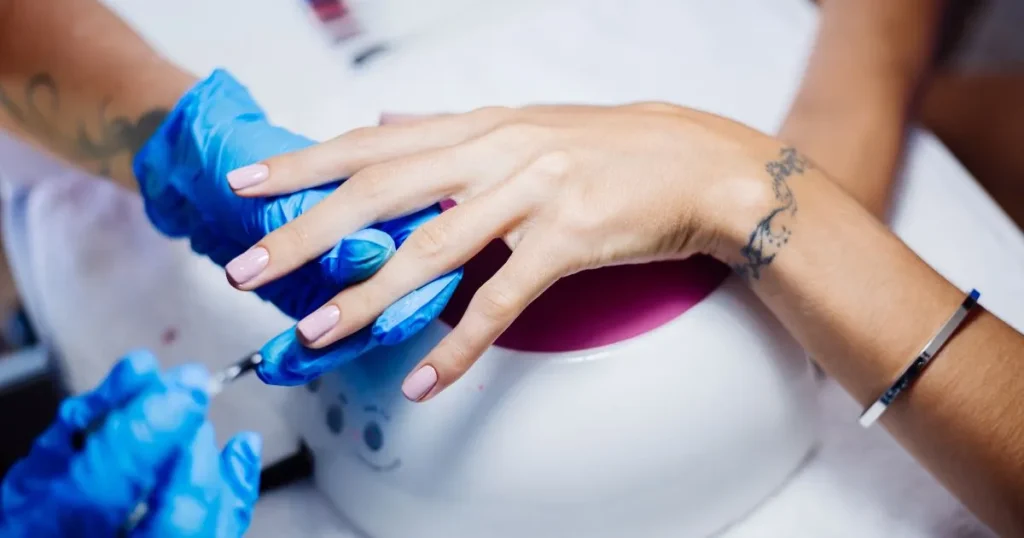
Want to take your nail game to the next level with a stunning cat eye effect? Getting a perfect cat eye gel nail polish look might seem hard. But, with the right steps and tips, you can nail this trendy style.
Applying cat eye gel nail polish takes some practice. But, the outcome is totally worth it. You’ll get a chic, layered look that’s great for any event. This article will show you how to get the best results with cat eye nail designs.
Key Takeaways
Learn the essential steps to apply cat eye gel nail polish like a pro.
- Achieve a flawless look with expert techniques for a smooth, even finish.
- Explore tips for customizing your cat eye nail designs to suit your style.
- Understand how to troubleshoot common mistakes when applying cat eye gel nail polish.
- Find out how to keep your cat eye nails looking fresh for longer.
What Is Cat Eye Gel Nail Polish?
Cat eye gel nail polish combines innovative technology with beauty, delivering a unique and captivating nail art experience.
The Science Behind the Magnetic Effect
The cat eye effect is created by iron particles embedded in the gel polish. When a magnet is near the nail, these particles move to form a unique pattern. This gives your nails a dynamic look. The magnetic field’s strength and direction decide the final look, opening up many creative options.
Different Types of Cat Eye Finishes
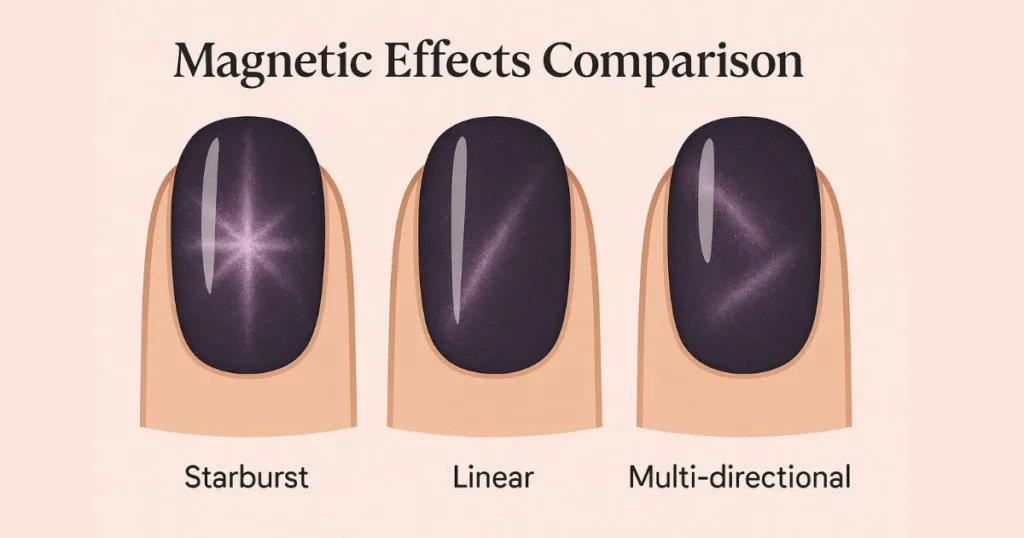
Cat eye gel nail polish has various finishes, from subtle shimmer to bold designs. You can pick from many colors and patterns, matching your style and the event. Popular finishes include linear cat eye, starburst, and radial effects, each with its own charm.
Benefits Over Traditional Nail Polish
Cat eye gel nail polish beats traditional polish in many ways . It offers enhanced durability, lasting up to two weeks without chipping. The cat eye effect adds a distinctive touch, making your manicure stand out from traditional nail art . With the right application and care, you can get a professional look at home.
Essential Tools and Materials for Perfect Application
To master cat eye nail polish designs, start with the basics. The right tools and materials are key for a flawless look.
Basic Nail Care Supplies
Before you apply cat eye gel polish, get your basic supplies ready. Gather tools like nail clippers, a nail file, and cuticle pushers—thorough nail prep is key to achieving a long-lasting manicure.
Cat Eye Gel Polish Components
Cat eye gel polish has special magnetic particles. These particles respond to a magnet, producing the signature cat eye effect. Understanding the ingredients in your gel polish helps you achieve the desired look.
Types of Magnets and Their Effects
The magnet type greatly affects your cat eye nail polish designs. Different magnets can change the color or pattern in various ways.
UV/LED Lamp Requirements
You need a UV or LED lamp to cure gel polish. Make sure your lamp works with your gel polish brand. Follow the curing times for the best results.
With these essential tools and materials, you’re ready to create stunning cat eye nail polish designs that last.
Preparing Your Nails for Flawless Results
Getting your nails ready is key to a salon-quality look at home. A clean nail surface helps your cat eye nail design stick well and last longer.
Preparing Your Nails for Flawless Results
Start by cleansing your nails with a mild cleanser to eliminate oils and dirt. Use a lint-free wipe to dry them. Next, file your nails to the shape you want, buffing lightly to help the gel polish stick.
Cuticle Care for Professional Appearance
Use a cuticle pusher or orange stick to gently push back your cuticles. Don’t push too hard to avoid bleeding or pain. Apply cuticle oil or cream to keep the area moisturized.
| Nail Preparation Step | Purpose | Tips |
| Cleaning | Remove oils and residue | Use a gentle nail cleanser |
| Filing | Shape the nail and create surface texture | File gently, buff lightly |
| Cuticle Care | Push back cuticles, moisturize | Be gentle, use cuticle oil |
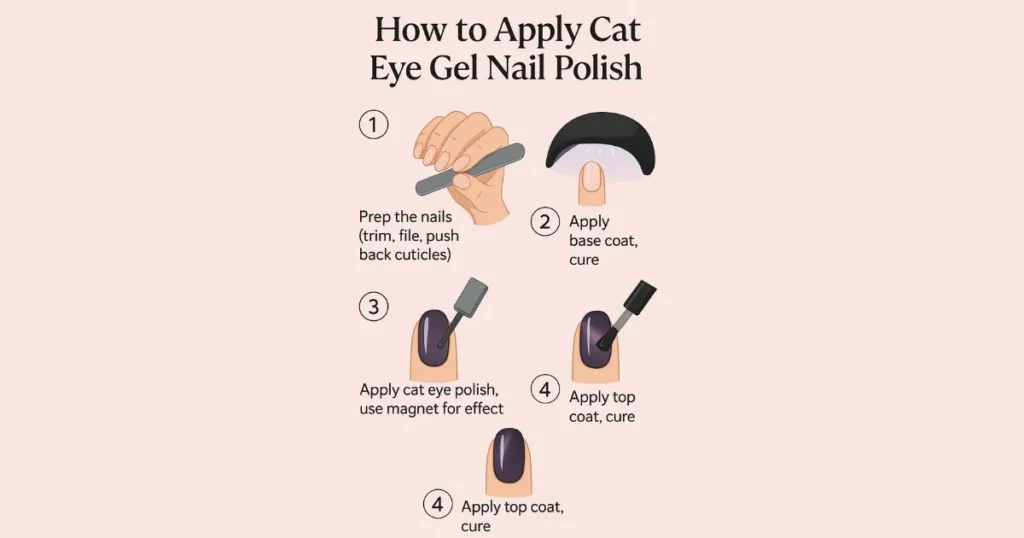
Applying Base Coat Correctly
Apply a light layer of clear base coat to shield your nails and improve gel polish adhesion. Cure it under the UV or LED lamp as the maker says.
Common Preparation Mistakes to Avoid
Don’t skip cleaning the nail surface, filing too hard, or not curing the base coat enough. Steer clear of these to get a perfect cat eye gel nail polish look.
Step-by-Step Cat Eye Gel Nail Polish Application
The cat eye nail art trend is growing fast. With proper instructions, it’s possible to do it on your own. It takes some skill, but with these steps, you’ll get the hang of it.
Applying the First Layer of Color
Begin by applying a thin layer of cat eye gel polish to your nail. Make sure to cover the whole nail evenly. It’s important to use a thin layer to avoid uneven curing and to get the magnetic effect right.
Optimal Curing Times and Techniques
Put your hand under the UV or LED lamp as directed. 3 . Usually, it takes 30 seconds to 1 minute, depending on the type of lamp and polish used. Keep your hand steady for an even cure.
Magnetic Placement for Different Effects
Right after applying the gel polish, hold the magnet over the nail without touching it. The distance between the magnet and the nail changes the cat eye effect. Experiment with various angles and distances to create unique patterns.
Sealing with Top Coat Without Disturbing the Design
Once you’ve achieved the cat eye effect and cured the polish, finish with a top coat for sealing. Apply a thin layer carefully to avoid smudging the design. Use a gentle, sweeping motion for best results.
Thin vs. Thick Top Coat Application
A thin top coat is usually best to keep the cat eye design clear. But, a thicker layer adds extra protection. Find the right balance; apply thin layers and cure between if needed.
Preventing Smudging During Top Coat Application
To avoid smudging, make sure the cat eye gel polish is fully cured before top coat. Also, don’t touch the nail surface with your fingers or
objects that might smudge the polish.
By following these steps and practicing, you can get a pro-looking cat eye gel nail polish at home. Always remember: the right tools and a steady hand lead to the best results.
Mastering Different Magnetic Techniques
Creating unique cat eye effects requires understanding and using different magnetic techniques. By learning these methods, you can make a variety of designs. These designs will enhance your cat eye gel nail polish applications.
Basic Linear Cat Eye Pattern
To get a basic linear cat eye pattern, place a magnet above the nail, parallel to it. This makes a sharp, linear look great for beginners. Hold the magnet steady for a few seconds to align the metallic particles well.
Creating Starburst and Radial Effects
For a more dramatic look, try starburst and radial effects. Adjust the magnet’s angle or move it in circles above the nail. This adds a creative twist to your designs.
Multi-directional Magnetic Designs
Multi-directional designs involve moving the magnet in various ways to create complex patterns. This method takes practice but yields stunning results. By changing the magnet’s direction, you can get unique, multi-dimensional effects.
Timing Tricks for Enhanced Magnetic Pull
The timing of when you place the magnet is key for the right effect. Pre-cure magnetic placement means applying the magnet before curing the gel polish. Post-application magnetic manipulation means adjusting the magnet after applying the polish.
Pre-cure Magnetic Placement
Pre-cure placement gives a stronger magnetic effect because the particles are moving. It’s perfect for bold, striking designs.
Post-application Magnetic Manipulation
Post-application manipulation lets you control the final look better. It’s great for fine-tuning the cat eye effect and getting a precise look.
Mastering these magnetic techniques lets you create a wide range of cat eye nail polish designs. Experiment with different methods to find what works best for you and your clients.
Advanced Cat Eye Nail Designs and Patterns
Take your nail art to the next level with advanced cat eye designs. These designs mix color, texture, and magnetic effects in new ways. Cat eye gel polish allows you to create bold, intricate designs.
Combining Multiple Colors for Dimension
To add depth to your cat eye designs, mix different colors. You can layer various shades of cat eye polish or blend them in one layer. This creates a magnetic effect that’s sure to impress. For instance, layer a light color over a dark base coat. Next, use a magnet to achieve a soft, gradient shimmer.
Creating Gradient and Ombré Effects
Gradient and ombré effects are big in nail art, and cat eye polish is perfect for them. By picking the right colors and using the magnetic effect, you can get a smooth transition between shades.
- Choose colors that complement each other.
- Apply a base coat to protect your nails.
- Use a makeup sponge to blend colors for a smooth ombré effect.
Adding Glitter and Embellishments
Glitter and embellishments can make your cat eye designs sparkle. Add glitter on top of your polish or use rhinestones for a bold look.
French Tips and Accent Nails with Cat Eye Polish
Cat eye polish is great for French tips and accent nails. For a classic look, apply polish to the tip and use a magnet for a subtle curve.
Reverse French with Magnetic Effects
A reverse French manicure features polish applied at the base of the nail instead of the tip. Cat eye gel polish adds a magnetic twist, making it visually interesting.
Creating Negative Space Designs
Negative space designs leave parts of the nail bare for a minimalist look. Mixing cat eye gel polish with negative space creates a modern, edgy design.
| Design Technique | Description | Tips |
| Combining Multiple Colors | Layer different shades for a 3D effect | Choose complementary colors |
| Gradient and Ombré Effects | Blend colors for a seamless transition | Use a makeup sponge for a smooth finish |
| Adding Glitter and Embellishments | Add extra glamour with glitter or rhinestones | Apply glitter on top of cat eye polish |
Troubleshooting Common Cat Eye Gel Nail Polish Issues
Even with careful application, you might face some issues with cat eye gel nail polish. This section provides solutions to common issues you might encounter. You’ll learn how to get a perfect cat eye nail design.
Weak or Faded Magnetic Effect Solutions
A weak or faded magnetic effect might be due to not enough magnetic gel polish or bad curing. Use high-quality cat eye gel polish and follow curing times. Also, try adjusting the magnet’s distance from your nail.
Fixing Smudges and Pattern Imperfections
Smudges and pattern issues can happen if the gel polish isn’t cured right or if the magnet moves. Cure each layer well and keep the magnet steady. If smudges appear, gently file them off or use a remover.
Addressing Curing Problems
Curing issues often come from a UV or LED lamp that’s not strong enough. Make sure your lamp is good for gel polish curing. Also, replace bulbs as the maker suggests.
Preventing Shrinkage, Lifting, and Chipping
To avoid shrinkage, lifting, and chipping, prepare your nails well and apply correctly. Clean and dry your nails before applying gel polish. Use a good base coat for better adhesion.
Temperature Considerations During Application
Temperature affects gel polish’s thickness and curing time. Apply in a room with a stable temperature of 65°F to 75°F (18°C to 24°C) for best results.
Product Consistency Issues
If your gel polish is too thick or too thin, it won’t apply smoothly. Check its consistency. If needed, use a thinner or warm the bottle in your hands. Tips for Maintaining and Prolonging the Life of Your Cat Eye Manicure To keep your cat eye manicure looking great, regular care is key. A well-maintained cat eye gel nail polish can last longer and stay bright. “A good nail care routine is just as important as the application process,” nail care experts say.
Daily Care Tips for Longevity
To make your cat eye manicure last, follow some daily tips. Start by wearing gloves when doing housework or handling harsh chemicals. This protects your nails and the gel polish. Also, avoid using your nails as tools to reduce the risk of cracks or chips. Lastly, moisturize your cuticles and nail beds often to keep them healthy.
Touch-up Techniques for Chips and Wear
Chips and wear can happen even with the best care. For small chips, apply a thin layer of gel polish and cure it under the UV/LED lamp. For bigger wear, you might need to apply more gel polish or top coat.
Safe Removal Process to Protect Natural Nails
When removing your cat eye gel nail polish, do it safely to protect your natural nails. Start by wrapping a cotton pad soaked in acetone around your finger, securing it with foil. Let it sit for 10-15 minutes before gently scraping off the gel polish with a cuticle pusher. Steer clear of abrasive products and strong chemicals to prevent damage.
Nail Health Between Applications
To keep your nails healthy between manicures, moisturize them. Apply cuticle oil daily with a nail brush, and give your nails occasional breaks from gel polish to allow recovery . By following these tips, you can enjoy a beautiful cat eye manicure for a long time. With consistent care, your cat eye manicure will stay vibrant and long-lasting.
Seasonal and Trending Cat Eye Nail Designs
From subtle to bold, cat eye nail designs change with the seasons and trends. This mix creates a constant flow of new and exciting styles. Stay in style by adding seasonal colors and themes to your cat eye gel nail polish designs. Whether you want something bold or a quiet touch, there’s a cat eye design for you.
Popular Color Combinations for Different Seasons
Light pastels and bright neons shine in spring and summer, while rich jewel tones and metallics dominate autumn and winter.Cat eye gel nail polish in these colors can make your manicure pop. For instance, a soft pink cat eye is great for spring, while metallic bronze or gold is perfect for autumn. Try mixing colors to stay trendy. Pairing colors that go well together or contrasting shades can make your nails stand out.
Holiday-Inspired Magnetic Looks
Holidays like Halloween and Christmas bring unique cat eye designs. For Halloween, try a spooky cat eye. For Christmas, go for a bold red and green design. Cat eye nail polish designs can be simple or complex, depending on your mood. To add holiday flair, use themed colors and decorations. Adding glitter on top of your cat eye design can make it even more festive.
Celebrity and Runway Cat Eye Nail Trends
Celebrities and fashion shows often show off the latest cat eye nail polish designs. These trends can be anything from simple to elaborate. Watching these trends can inspire your next manicure. Celebrities and influencers often share their favorite nail designs on social media. This gives fans and followers endless inspiration.
Social Media Inspiration for Unique Designs
Instagram is full of cat eye nail inspiration. People share their unique designs, from simple to artistic. It’s a great place to find ideas for your next manicure. Following nail artists and beauty influencers on social media keeps you updated on the latest cat eye gel nail polish trends and techniques.
Conclusion
Now you’re equipped with the steps to create a cat eye gel manicure . It’s time to get creative with different designs. Try out simple and complex patterns to find your favorite. Play with colors to make unique designs. Add glitter and embellishments for extra sparkle. Cat eye nail polish lets you create salon-quality nails at home. Want to improve your nail art? Practice magnetic techniques and explore cat eye designs. With time and effort, you’ll make nails that wow everyone. Whether you love nail art or are just starting, cat eye gel polish is perfect. Don’t be shy to try new designs. You might find your new favorite look
FAQ
What is cat eye gel nail polish, and how does it work?
Cat eye gel polish is a unique type of gel nail polish . It uses magnetic technology to make a cat eye design on your nails. The polish has iron particles that a magnet attracts, making the design.
How do I choose the right magnet for my cat eye gel nail polish?
The magnet you need depends on the design you want. Different magnets can make different patterns, like lines or stars. Try out different magnets to find the one you like best.
What makes cat eye gel polish better than traditional nail polish?
Cat eye gel polish lasts longer and is more durable than regular polish. It also lets you get creative with many designs. How do I prevent smudging during top coat application? To avoid smudges, cure the polish well and apply a thin top coat. Don’t touch or move the nail while applying top coat.
Can I use cat eye gel nail polish on natural nails?
Yes, you can use it on natural nails. Just make sure to apply and remove it carefully to protect your nails.
How can I take off cat eye gel nail polish?
Simply use a gel polish remover and follow the recommended removal process. Be gentle to avoid harming your nails.
What are some common mistakes to avoid when applying cat eye gel nail polish?
Don’t make mistakes like bad nail prep, wrong magnet use, or not curing enough. Always follow the instructions and take your time.
Can I create cat eye nail designs at home, or do I need to visit a salon?
You can do cat eye designs at home with the right tools. But, if you’re new, practicing or getting help from a pro might be a good idea.